


Cat Ears (F3)
These ears can be worn flat on an Alice band or wrapped and pinned as individual accessories. Knitted in orange they also make pretty good fox ears.
A printable version of this pattern is available.
You will need:
- pink and black double knit yarn
- 4 x hair grips (or an Alice band)
- 3.25mm knitting needles
- tapestry needle
- scissors
Pattern:
Cast on 3 stitches in black to begin shaping the back of the ear.
(A list of abbreviations is available.)
- Row 1: pfb x 2, p1 (5)
- Row 2: kfb x 4, k1 (9)
- Row 3: pfb, p6, pfb, p1 (11)
- Row 4: kfb, k3, kfb x 2, k3, kfb, k1 (15)
- Row 5: pfb, p12, pfb, p1 (17)
- Row 6: kfb, k6, kfb x 2, k6, kfb, k1 (21)
- Row 7: pfb, p18, pfb, p1 (23)
- Row 8: kfb, k9, kfb x 2, k9, kfb, k1 (27)
- Row 9: pfb, p24, pfb, p1 (29)
- Row 10: kfb, k12, kfb x 2, k12, kfb, k1 (33)
- Row 11: pfb, p30, pfb, p1 (35)
- Row 12: kfb, k15, kfb x 2, k15, kfb, k1 (39)
- Row 13: pfb, p36, pfb, p1 (41)
- Row 14: kfb, k18, kfb x 2, k18, kfb, k1 (45)
- Row 15: p –
Short rows are used to shape the top of the ear.
- Row 16: k39 w&t/ p33 w&t/ k27 w&t/ p21 w&t/ k15 w&t/ p9 w&t/ k4, k2tog, k21 (44)
Return to working straight to keep the front of the ear neat.
- Row 17: p –
- Row 18: k –
Finally change to pink yarn for the front/inside of the ear.
- Row 19: k2togtbl, k18, k2togtbl, k2tog, k18, k2tog (40)
- Row 20: p2togtbl, p36, p2tog (38)
- Row 21: k2togtbl, k15, k2togtbl, k2tog, k15, k2tog (34)
- Row 22: p2togtbl, p30, p2tog (32)
- Row 23: k2togtbl, k12, k2togtbl, k2tog, k12, k2tog (28)
- Row 24: p2togtbl, p24, p2tog (26)
- Row 25: k2togtbl, k9, k2togtbl, k2tog, k9, k2tog (22)
- Row 26: p2togtbl, p18, p2tog (20)
- Row 27: k2togtbl, k6, k2togtbl, k2tog, k6, k2tog (16)
- Row 28: p2togtbl, p12, p2tog (14)
- Row 29: k2togtbl, k3, k2togtbl, k2tog, k3, k2tog (10)
- Row 30: p2togtbl, p6, p2tog (8)
- Row 31: k2togtbl x 2, k2tog x 2 (4)
Thread yarn through remaining stitches and pull tight.
Making Up:
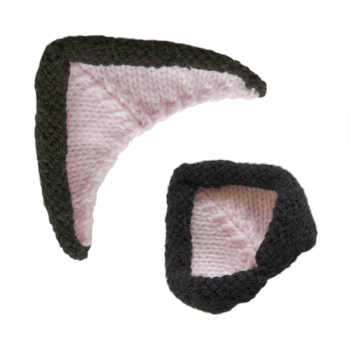
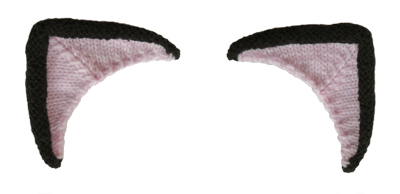
I'm going to describe two ways to wear the ears, flat...
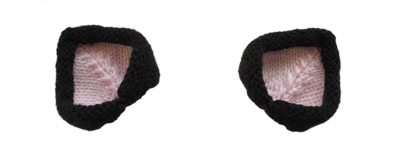
...or with the corners joined together.
Real cat ears fall somewhere between the two positions but keeping the knitted ears symmetrically half curled is tricky unless you're sewing them into position on a wide base, like a hat or fabric hairband.
For the flat ears simply tack the sides of the open edge together and hide loose ends inside the ear. The individual cat ears can then be sewn or glued along the length of an Alice band. The bottom edge of the ears is a curve that fits naturally around the dome of a head so they should stay upright without a wire reinforcement.
For the curled ears tack the sides of the open edge together using long loose stitches. Bind opposite corners of the ear together with a couple of small, neat stitches. These ears can be pinned into position using wire hair grips inserted through the loose stitches along the base.
Notes:
Needle/Yarn Size
As with most ODDknit patterns the yarn and needle sizes in the "you will need" section are just a guide. Feel free to improvise with whatever needles and yarn you have lying around - that's half the fun!
<<< See more Costume Knits
© 2016 All desgins and images are copyright of ODDknit. If you enjoy the content of this website, please consider buying me a coffee at the link below.