


Bindweed (R3)
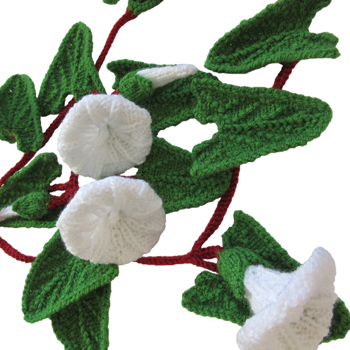
Bindweed a.k.a. Granny-Pop-Out-Of-Bed is a weed because it grows everywhere and is really hard to get rid of. That doesn't stop it being kind of pretty. This pattern is for a full vine of leaves and flowers and can be knitted as long or as short as you want.
A printable version of this pattern is available.
You will need:
- green, white and dark red yarn (double knit)
- 2 x double ended knitting needles (3mm)
- 1 x circular knitting needle (2.5mm)
- tapestry needle
- scissors
Pattern:
(A list of standard abbreviations is available.)
Leaf
Each side of the leaf is worked as a set of short rows. No need to wrap and turn, just rotate the knitting when you come to the end of the described stitches.
For each slipped stitch make sure the yarn is carried across the reverse (purl side) of the leaf.
Using 3mm needles cast on 15 stitches in green.
- Row 1: k5, p1, k4, p1, k4
- Row 2: sl1, p2, k1, p4, k1, p4, k1, p1, cast on 5 k-wise
- Row 3: k1, k2tog, k4, p1, k4, p1, k4, p1, turn/
- Row 4: sl1, p3, k1, p4, k1, p2, k1, p4
- Row 5: k1, k2tog, k5, p1, k4, p1, k1, turn/
- Row 6: sl1, p4, k1, p4, k1, p3
- Row 7: kfb, k1, p1, k1, p1, k4, p1, k1, turn/
- Row 8: sl2, p3, k1, p3, k1, p2
- Row 9: kfb, p1, k5, p1, turn/
- Row 10: sl2, p5, k1, p1
Cast off k-wise until one stitch remains. Don't cut the yarn, keep the remaining stitch on the right-hand needle, or a stitch keeper if easier.
Next use the left-hand needle to pick up 14 stitches along the cast-on edge of the knitting. This will form the central spine of the leaf. Do not knit the stitches at this point, just slip loops from the knitting's edge onto the needle.
Move the single stitch remaining from the cast-off edge onto the left hand needle as well (15 sts total).
- Row 11: k1, p13, k1
- Row 12: p5, k1, p4, k1, p4
- Row 13: sl1, k2, p1, k4, p1, k4, p1, k1, cast on 5 p-wise
- Row 14: p1, p2tog, p4, k1, p4, k1, p4, k1, turn/
- Row 15: sl1, k3, p1, k4, p1, k2, p1, k4
- Row 16: p1, p2tog, p5, k1, p4, k1, p1, turn/
- Row 17: sl1, k4, p1, k4, p1, k3
- Row 18: pfb, p1, k1, p1, k1, p4, k1, p1, turn/
- Row 19: sl2, k3, p1, k3, p1, k2
- Row 20: pfb, k1, p5, k1, turn/
- Row 21: sl2, k5, p1, k1
Cast off all remaining stitches purl-wise.
Small Leaf
Using 3mm needles cast on 8 stitches in green.
- Row 1: k3, p1, k4
- Row 2: sl1, p2, k1, p2, k1, p1, cast on 3 k-wise
- Row 3: k2, p1, k2, p1, k2, p1, turn/
- Row 4: sl2, k1, p4, k1, p1
As for the first leaf design cast off k-wise until one stitch remains. Keep the remaining stitch on the right-hand needle. Use the left-hand needle to pick up 7 stitches along the cast-on edge of the knitting then move the single stitch remaining from the cast-off edge onto the left hand needle as well (8sts total).
- Row 5: k1, p6, k1
- Row 6: p3, k1, p4
- Row 7: sl1, k2, p1, k2, p1, k1, cast on 3 p-wise
- Row 8: p2, k1, p2, k1, p2, k1, turn/
- Row 9: sl2, p1, k4, p1, k1
Cast off all remaining stitches purl-wise.
Tiny Leaf
Using 3mm needles cast on 4 stitches in green.
- Row 1: k3, turn/
- Row 2: p3, cast on 2 k-wise
Cast off k-wise until one stitch remains. Keep the remaining stitch on the right-hand needle. Use the left-hand needle to pick up 3 stitches along the cast-on edge of the knitting then move the single stitch remaining from the cast-off edge onto the left hand needle as well (4sts total).
- Row 3: k1, p2, k1
- Row 4: p3, turn/
- Row 5: k3, cast on 2 p-wise
Cast off all remaining stitches purl-wise.
Flower
Using 3mm needles cast on 2 stitches in white. I-cord 9 rows. Continue in the round as follows, separating out the stitches onto multiple needles as necessary.
- Round 1: kfb, kfbf
- Rounds 2-5: k –
- Round 6: kfb x 5
- Rounds 7-9: k –
- Round 10: [kfb, k1] x 5
- Rounds 11-12: [k1, p1, k1] x 5
- Round 13: [k1, p1, kfb] x 5
- Rounds 14-15: [k1, p1] x 10
- Round 16: [k1, pfb, kfb, p1] x 5
- Rounds 17-19: [k1, p2] x 10
- Round 20: [k1, p1, pfb, kfb, p2] x 5
- Round 21: [k1, p3] x 10
- Round 22: [k1, p2, pfb, kfb, p3] x 5
- Rounds 23-24: [k1, p4] x 10
Cast off p-wise.
Bud
Using 3mm needles cast on 5 stitches in white. Separate onto two or three needles and join into the round. Continue as follows:
- Round 1: kfb x 5
- Round 2 (and all even rounds): k –
- Round 3: k8, p2tog
- Round 5: k7, p2tog
- Round 7: k6, p2tog
- Round 9: k5, p2tog
- Round 11: k4, p2tog
- Round 13: k3, p2tog
- Round 15: k2, p2tog
After ending on a knit round, thread yarn through remaining stitches and pull tight.
Sepals
Using 3mm needles cast on 6 stitches in green. Separate onto two or three needles and join into the round. Continue as follows:
- Round 1: [p1, kfb, kfb] x 2
- Round 2: [p1, kfb, k1, kfb, k1] x 2
- Rounds 3-5: [p1, k6] x 2
Switch to working in the flat for the final round, which is worked in two sections.
- Round 4: k2tog, k3, k2tog, turn/ p5, turn/ k1, k2tog, k2tog, turn/ p3. Cut yarn and thread through remaining stitches. Reattach the yarn at the start of the live stitches and repeat once more so no stitches remain.
Making Up:
How many of each knitted item you need depends on how long, and how flower heavy you would like to make your vine. As a guide you will need one tiny leaf and two small leaves (for the growing end of the vine), followed by one full size leaf for every further 7cm of vine. Knit about as many flowers and buds combined as there are leaves. You will need a sepal for each one.
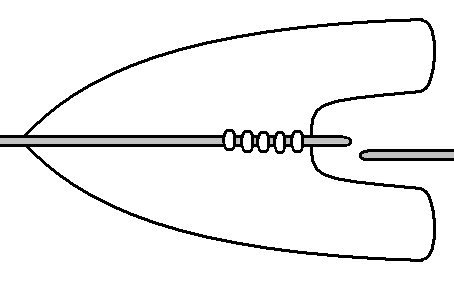
The flowers need to be folded into shape by tugging downwards at the point where the i-cord stamen meets the increasing stitch count of the petals, see picture of the cross-section to the left.

Sew each folded flower into a sepal running the yarn through the base a couple of times to fix in position. Each bud also needs to be sewn into a sepal.
Lose any loose ends remaining on the leaves or flowers by working them into the fabric of the knitting.
Pattern:
Stem
All knitted items are worked into the knitted stem as it is made. It's going to involve and lot of stitches on the needle at once which is why I recommend using a circular needle for this step.
Using dark red yarn either finger knit 20 or cast on 1 and i-cord 20. Place remaining loop onto the circular needle as the starting point of the stem.
Follow the instructions below to attach each knitted item to the stem beginning with tiny and small leaves. After each item is attached return all stitches to the left hand needle.
Attach the tiny leaf to the stem:
Cast on 3 stitches. Pick up 3sts more in a line along the back spine of the tiny leaf. Knit them from the edge of the leaf towards the centre. Reverse the needles and cast off 6 stitches, slipping the first stitch for a neater end.
Attach each small leaf to the stem:
Cast on 24 stitches. Pick up 4 more in a line along the back spine of the small leaf. Knit them from the edge of the leaf towards the centre. Cast off 8 stitches, slipping the first for a neater end.
Attach each further leaf to the stem:
Cast on 25 stitches. Pick up 5 more along the back of the leaf's spine. Cast off 10 stitches slipping the first for a neater end.
Attach a sepal (flower or bud):
At each join of full size leaf and stem you have the option to add one or more sepals. Try to do so in a way that looks random. Cast on 5 stitches, pick up and knit 4 stitches in a round circle around the base of the sepal. Cast off 9 stitches.
Finish:
When all leaves and flowers have been attached finish the stem by casting off all the stitches that remain on the needle. Where sepals and leaves have been joined at the same point you may need to pick up and extra stitch to close any possible holes in the stem.
Sew the two remaining loose ends of yarn into the fabric of the stem.
Notes:
Needle/Yarn Size
As with most ODDknit patterns the yarn and needle sizes in the "you will need" section are just a guide. Feel free to improvise with whatever needles and yarn you have lying around – that's half the fun!
<<< See more Trees and Leaves
© 2016 All desgins and images are copyright of ODDknit. If you enjoy the content of this website, please consider buying me a coffee at the link below.