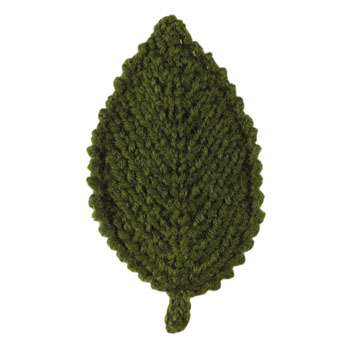
Elm Leaf (F3)

The elm has a nice leaf-shaped-leaf with a serrated edge. It can double for other leaf-shaped-leaves as needed. The pattern below includes instructions on how to make three different sizes.
A printable version of this pattern is available.
You will need:
- green yarn (double knit)
- covered thin gauge wire (e.g. garden twist tie)
- 2 x double ended knitting needles (3mm)
- tapestry needle
- scissors
Pattern:
(A list of standard abbreviations is available.)
Leaf:
Cast on 7 stitches and continue in the flat.
- Row 1: k1, p1, kfb x 2, k1, p2 (9)
- Row 2: [p1, k1] x 4, k1 (9)
- Row 3: k1, p1, k1, pfb, kfb, p1, k1, p2 (11)
- Row 4: [p1, k1] x 2, p2, [p1, k1] x 2, k1 (11)
- Row 5: [k1, p1] x 2, kfb x 2, [k1, p1] x 2, p1 (13)
- Row 6: [p1, k1] x 6, k1 (13)
- Row 7: [k1, p1] x 2, k1, pfb, kfb, [p1, k1] x 2, p2 (15)
- Row 8: [p1, k1] x 3, p2, [p1, k1] x 3, k1 (15)
- Row 9: [k1, p1] x 3, kfb x 2, [k1, p1] x 3, p1 (17)
- Row 10: [p1, k1] x 8, k1 (17)
- Row 11: [k1, p1] x 3, k1, pfb, kfb, [p1, k1] x 3, p2 (19)
- Row 12: [p1, k1] x 4, p2, [p1, k1] x 4, k1 (19)
- Row 13: [k1, p1] x 4, kfb x 2, [k1, p1] x 4, p1 (21)
- Row 14: [p1, k1] x 10, k1 (21)
We have now reached the widest part of the leaf. The following section has straight edges.
- Row 15: k1, p2tog, [p1, k1] x 3, pfb, kfb, [p1, k1] x 3, p1, p2tog, p1 (21)
- Row 16: p1, k1, [k1, p1] x 4, p1, [p1, k1] x 4, k2 (21)
- Row 17: k1, p2tog, [k1, p1] x 3, kfb x 2, [k1, p1] x 3, k1, p2tog, p1 (21)
- Row 18: [p1, k1] x 10, k1 (21)
- Rows 19-22: as rows 15-18.
To finish off the leaf we decrease the size of the rows back to a point.
- Row 23: k1, p2tog, [p1, k1] x 3, pfb, kfb, [p1, k1] x 3, p1, p2tog, p1 (21)
- Row 24: p1, k2tog, [p1, k1] x 3, p2, [p1, k1] x 3, p1, k2togtbl, k1 (19)
- Row 25: k1, p2tog, [p1, k1] x 2, p1, kfb x 2, [k1, p1] x 3, p2tog, p1 (19)
- Row 26: p1, k2tog, [p1, k1] x 6, p1, k2tog, k1 (17)
- Row 27: k1, p2tog, [p1, k1] x 2, pfb, kfb, [p1, k1] x 2, p1, p2tog, p1 (17)
- Row 28: p1, k2tog, [p1, k1] x 2, p2, [p1, k1] x 2, p1, k2togtbl, k1 (15)
- Row 29: k1, p2tog, p1, k1, p1, kfb x 2, [k1, p1] x 2, p2tog, p1 (15)
- Row 30: p1, k2tog, [p1, k1] x 4, p1, k2togtbl, k1 (13)
- Row 31: k1, p2tog, p1, k1, pfb, kfb, p1, k1, p1, p2tog, p1 (13)
- Row 32: p1, k2tog, p1, k1, p3, k1, p1, k2togtbl, k1 (11)
- Row 33: k1, p2tog, p1, kfb x 2, k1, p1, p2tog, p1 (11)
- Row 34: p1, k2tog, [p1, k1] x 2, p1, k2togtbl, k1 (9)
- Row 35: k1, p2tog, ybck, sl1, k2tog, psso, p2tog, p1 (5)
- Row 36: p1, sl1, p2tog, psso, k1 (3)
- Row 37: k2, p1 (3)
- Row 38: p2, k1 (3)
Thread yarn through remaining stitches and pull into a point.
Veins/Stalk:
- Cast on 2 sts
- i-cord 3 rows.
- Working as for i-cord, kfb, k1 (3)
- i-cord 3 rows.
- Working as for i-cord, kfb, k2 (4)
- i-cord until the vein is same length as the leaf.
- Thread yarn through remaining sts.
Variations:
With a little rearranging of the pattern we can make a 3/4 sized leaf and a 1/2 sized leaf of similar shape and pattern.
3/4 Size Leaf
Work rows 1 to 10 from the main leaf pattern.
Rows a to d follow. They are worked slightly differently to anything in the main pattern.
- Row a: k1, p2tog, [p1, k1] x 2, pfb, kfb, [p1, k1] x 2, p1, p2tog, p1 (17)
- Row b: p1, k1, [k1, p1] x 3, p1, [p1, k1] x 3, k2 (17)
- Row c: k1, p2tog, [k1, p1] x 2, kfb x 2, [k1, p1] x 2, k1, p2tog, p1 (17)
- Row d: [p1, k1] x 8, k1 (17)
Work rows 27 to 38 of the main pattern and finish off as instructed.
1/2 Size Leaf
Work rows 1 to 6 from the main leaf pattern, rows e to h as below, and rows 31 to 38 to finish.
- Row e: k1, p2tog, p1, k1, pfb, kfb, p1, k1, p1, p2tog, p1 (13)
- Row f: p1, k1, [k1, p1] x 2, p1, [p1, k1] x 2, k2 (13)
- Row g: k1, p2tog, k1, p1, kfb x 2, k1, p1, k1, p2tog, p1 (13)
- Row h: [p1, k1] x 6, k1 (13)
Longer/Shorter Leaf
The shape of the leaf pattern can also be modified by adding/subtracting multiples of the 4 rows that form the straight edge part at the centre (rows 15-18 or a-d or e-h). It has to be the complete set of 4 rows that are added or subtracted or the ribs won't work match up in the rest of the pattern.
Making Up:
Gather the sides of the cast on edge together to make a rounded bottom to the leaf.
Bend a piece of wire to half the length of the leaf, doubling the ends over for safety (see diagram).
Cover the wire stalk with the knitted vein. Attach the vein along the centre of the leaf. The vein should not quite reach all the way to the tip of the leaf. Sew in any remaining loose ends.
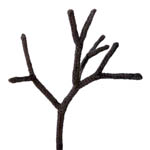
Look at the ODDknit patterns for twigs and horse chestnut leaves for ideas on joining multiple leaves together. Bear in mind that elm leaves are arranged alternately on their twigs.
Notes:
Needle/Yarn Size
As with most ODDknit patterns the yarn and needle sizes in the "you will need" section are just a guide. Feel free to improvise with whatever needles and yarn you have lying around – that's half the fun!
<<< See more Trees and Leaves
© 2013 All desgins and images are copyright of ODDknit. If you enjoy the content of this website, please consider buying me a coffee at the link below.


