


Advent Calendar (F4)
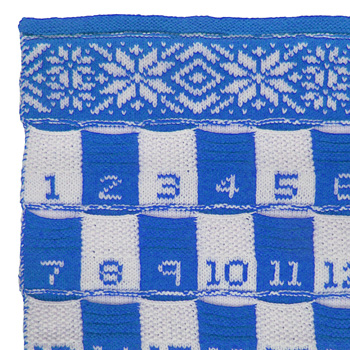
This project is quite a bit bigger than most ODDknits (40cm x 50cm approx), but with twenty four little pockets to fit in, it almost had to be. The important thing is that the pattern requires no sewing at all, just weave in the four loose ends and you're done.
A printable version of this pattern is available.
You will need:
- approx 90g each red and white dk yarns
- 1 x 3.5mm circular needle
- 2 x 3.5mm double ended knitting needles
- tapestry needle
- scissors
- piece of dowel rod or pipe approx 40cm x 1.2cm
Pattern:
This pattern assumes familiarity with the double knitting technique. A list of abbreviations is available.
Using the circular needle cast on 80sts with a double thickness of yarn (160).
Number Band 1
Slip all stitches from the left needle to the right, reordering each pair of loops so that the red stitch is first and the white stitch is second. Once finished, push the knitting back along length of the needle ready to begin knitting from where the yarn is attached.
NB Row 1: Knit the first two loops together using a double thickness of yarn. Work through the bottom line of Chart A, right to left, using the double knitting technique. Knit the two loops remaining together, using a double thickness of yarn.
NB Row 2: Purl the first two loops together using a double thickness of yarn. Work through the second line of Chart A, left to right. Purl the last two loops together using a double thickness of yarn.
Repeat NB Rows 1 and 2 for each line of Chart A.
Pocket Band 1
- Knit (odd row) or purl (even row) the first two stitches together with both yarns. Drop the white yarn and work through the red half of the row instructions. Slip the last two stitches.
- Without turning the knitting slip it back along the needle. Begin again from the same end where the white yarn is attached.
- Slip the first two stitches. Pick up the white yarn and work through the white half of the row instructions. Knit (odd row) or purl (even row) the last two stitches together with both yarns.
Work through the bullet points for each of the following two part rows.
- PB Row 1 (Red): {[sl1, k1] x13, [p1, sl1] x13, ybck} x3
- PB Row 1 (White): {[p1, sl1, k1, yfwd, sl1] x6, p1, sl1, ybck, [sl1, k1] x13} x3
- PB Row 2 (Red): {ybck, [sl1, k1] x13, [p1, sl1] x13} x3
- PB Row 2 (White): {[p1, sl1] x13, ybck, [sl1, p1, ybck, sl1, k1] x6, sl1, p1} x3
- PB Row 3 (Red): {[sl1, k1] x13, [k1, yfwd, sl1] x13, ybck} x3
- PB Row 3 (White): {[p1, sl1, k1, yfwd, sl1] x6, p1, sl1, ybck, [sl1, k1] x13} x3
- PB Row 4 (Red): {[ybck, sl1, p1] x13, [p1, sl1] x13} x3
- PB Row 4 (White): {[p1, sl1] x13, ybck, [sl1, p1, ybck, sl1, k1] x6, sl1, p1} x3
Repeat these four rows twice more, then repeat rows 1 and 2 again (14 rows total).
Cast Off Row 1
Now for the fiddly bit. Knit the first two loops together with a double thickness of yarn. Drop the white yarn and working with the red yarn only, sl1, k1, then repeat the following bullet points twice in their entirety and once more to the asterisk.
- [sl1, k1] x 12
- yfwd
- Separate out the next 26 stitches by slipping the red stitches onto a dpn held in front of the knitting and the white stitches onto the right side of the circular needle.
- Cast off 12 red stitches from the dpn. One red loop will remain.
- Pull the red loop between the two white stitches on either side of the circular needle. The dpn and yarn are now held at the back of the work.*
- Slip the next white loop from the left to the right of the circular needle.
- Slip the red stitch off the dpn onto the right hand side of the circular needle.
- Cast off one more by knitting the next stitch and passing the previous stitch over it.
After the asterisk slip the remaining red loop onto the right side of the circular needle. Slip the last two loops.
Without turning the knitting slip it back along the needle. Begin the row again. Slip the first two loops, then working with the white yarn only repeat the following bullet points three times:
- yfwd
- Separate out the next 26 stitches by slipping the white stitches onto a dpn held in front of the knitting and the red stitches onto the right side of the circular needle.
- Cast off 12 white stitches from the dpn. One white loop will remain.
- Return this loop to the right hand side of the circular needle.
- Cast off one more stitch by knitting the next loop and passing the previous stitch over it.
- k12
Knit the last three loops together using a double thickness of yarn.
Transition Band 1
The three rows in this section are all worked with a double thickness of yarn.
TB Row 1: Purl the first two loops together, purl each individual stitch separately until you reach the last two, purl the last two loops together. (160)
TB Row 2: Knit the first two loops together, purl each pair of loops together until you reach the last two, knit the last two loops together.
TB Row 3: Purl each pair of loops together across the row.
Number Band 2
Work as for Number Band 1, except use Chart B.
Pocket Band 2
This section is worked to the same general set up as Pocket Band 1, but the individual rows are as follows:
- PB Row 1 (Red): {[p1, sl1] x13, ybck, [sl1, k1] x13} x3
- PB Row 1 (White): {[sl1, k1] x13, [p1, sl1, k1, yfwd, sl1] x6, p1, sl1, ybck} x3
- PB Row 2 (Red): {[p1, sl1] x13, ybck, [sl1, k1] x13} x3, yfwd
- PB Row 2 (White): {ybck, [sl1, p1, ybck, sl1, k1] x6, sl1, p1, [p1, sl1] x13} x3
- PB Row 3 (Red): {[k1, yfwd, sl1] x13, ybck, [sl1, k1] x13} x3
- PB Row 3 (White): {[sl1, k1] x13, [p1, sl1, k1, yfwd, sl1] x6, p1, sl1, ybck} x3
- PB Row 4 (Red): {[p1, sl1] x13, [ybck, sl1, p1] x13} x3
- PB Row 4 (White): {ybck, [sl1, p1, ybck, sl1, k1] x6, sl1, p1, [p1, sl1] x13} x3
Cast Off Row 2
This section has the same bullet points (~ish) as for cast off row 1, but not necessarily in the same order. It was easier just to write it out again. Knit the first two loops together with a double thickness of yarn. Drop the white yarn and working with red only repeat the following bullet points three times:
- yfwd
- Separate out the next 26 stitches by slipping the red stitches onto a dpn held in front of the knitting and the white stitches onto the right side of the circular needle.
- Cast off 12 red stitches from the dpn. One red loop will remain.
- Pull the red loop between the two white stitches on either side of the circular needle. The dpn and yarn are now held at the back of the work.
- Slip the next white loop from the left to the right of the circular needle.
- Slip the red stitch off the dpn onto the right hand side of the circular needle.
- Cast off one more by knitting the next stitch and passing the previous stitch over it.
- [sl1, k1] x 12
Slip the last two loops.
Without turning the knitting slip it back along the needle. Begin again from the same end as before. Slip the first two loops, then working with the white yarn only k1, then repeat the following bullet points twice in their entirety, then once more to the asterisk:
- k12
- yfwd
- Separate out the next 26 stitches by slipping the white stitches onto a dpn held in front of the knitting and the red stitches onto the right side of the circular needle.
- Cast off 12 white stitches from the dpn. One white loop will remain.*
- Return this loop to the right hand side of the circular needle.
- Cast off one more by knitting the next stitch and passing the previous stitch over it.
After the asterisk slip the single white loop onto the left hand side of the circular needle, then knit the last three loops together using a double thickness of yarn.
Transition Band 2
As Transition Band 1.
Repeats 3 & 4
Repeat all sections from Number Band 1 to Transition Band 2, changing only the chart that is worked for the number band sections.
Pattern Band
Work Chart E as though it was another number band (i.e. with the same edging).
Top
The next three rows are basically another type of transition band and are all worked with a double thickness of yarn.
T Row 1: Knit the first two loops together. Knit each pair of loops together through the back of the loops to the last two stitches in the row. Knit the last two loops together.
T Row 2: Purl the first two loops together, knit each pair of loops together until you reach the last two, purl the last two loops together.
T Row 3: Knit each pair of loops together across the row. (160)
Slip all stitches from left to right, reordering each pair of loops so that the white stitch is first and the red stitch is second. Push the knitting along the length of the needle ready to begin knitting from where the yarn is attached.
T Row 4: Every pair of loops (including the first and last) are worked as for a double knit stitch – knit one stitch with white, bring both yarns forward, purl one stitch red, take both yarns back, repeat.
Cut the white yarn. With red yarn only:
T Row 5: [p1, sl1] x 80
T Row 6: [sl1, k1] x 80
Repeat these two rows four more times each. The red knitting will form a tube, make sure NOW that the dowel rod or pipe you have selected for hanging (see Making Up) will fit inside the knitted tube. If not, repeat rows 5 and 6 until it does.
T Row 15: To cast off, k2tog, [k2tog, pass previous stitch over] x 79, cut yarn and thread through remaining stitch.
Making Up:
Work in the loose ends of yarn to finish. That's it for the knitting. No sewing at all.
There are two ways to hang the finished advent calendar. Both use left over yarn which can either be used as is, or plated / twisted / finger knitted into a more substantial cord. Dowel Rods or narrow gauge pipe can be found at many craft or DIY stores, but sometimes it's cheaper to re-purpose another item. I cut my pipe from a plastic pitchfork I picked up cheap after Halloween.
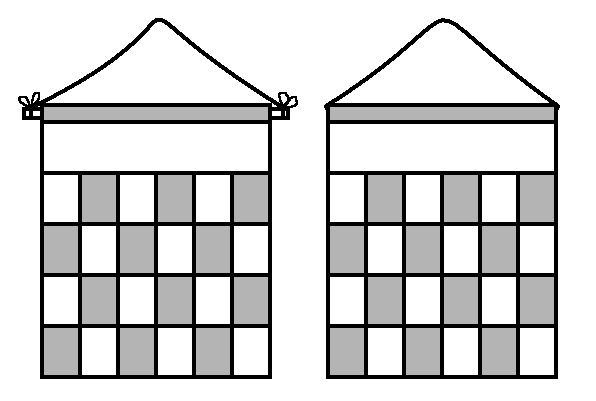
Dowel Rod Method (Left)
Cut a piece of dowel rod approximately 4 cm longer than the width of the knitting. Insert it into the knitted tube at the top of the calendar. Tie a length of yarn to each exposed end of the dowel. Use bows for extra fancy.
Pipe Method (Right)
Cut a piece of narrow piping 1 cm shorter than the width of the knitting. Insert it into the knitted tube so that it is completely hidden. Run a length of yarn all the way through the pipe and tie in a loop. Hide the knot inside the piping.
Charts:
Click the image for a larger version.

Notes:
Needle/Yarn Size
As with most ODDknit patterns the yarn and needle sizes in the "you will need" section are just a guide. Feel free to improvise with whatever needles and yarn you have lying around - that's half the fun!
<<< See more Christmas Patterns
<<< See more Decorations
© 2016 All desgins and images are copyright of ODDknit.