Double Knitting

The double knitting technique (not to be confused with the yarn weight) is a method of producing a double thick fabric. Both sides look like right-side stocking stitch but are different colours. Any colour pattern worked on the front will be mirrored in reverse colours on the back.
You will need:
- yarn leftovers
- 2 x knitting needles
Technique
The first thing to know about double knitting is that it's much easier than you think. Basically it's just single rib while alternating between two balls of yarn. The second thing to know about double knitting is that it lets you do colour work without worrying about floats. It's awesome.
There are three sections on this page. 'The Double Knit Stitch' describes the basic stitch unit you will need. 'Working a Grid' describes how to set up and work through a complete pattern. 'Adjustments' describes a couple of extra steps you can take to neaten your work. Increasing and decreasing are not covered at this time.
The Double Knit Stitch
At the start of a double knit stitch there are two differently-coloured loops of yarn on the needle and two differently-coloured strands of yarn ready to be worked.
Hold both strands of yarn at the back of the work as though you are about to knit a stitch with them.
Insert the needle knit-wise into the first loop. Complete the knit stitch with one of the coloured strands. This will be the colour that shows on the side of the fabric facing you.
Bring both strands of yarn to the front as though you are about to purl a stitch with them.
Insert the needle purl-wise into the next loop. Complete the purl stitch with the second coloured strand. This will be the colour that shows on the reverse side of the fabric.
These two worked loops make a single double knit stitch.
Working a Grid
Draw out a pattern on asymmetrical graph paper that has been set up for stocking stitch.
Choose two colours of yarn that are identical weight but contrasting colours. Holding both yarns together – to make a double thickness – cast on the number of stitches in the grid plus two more for the edging.

ODD ROWS
- Knit the first two loops together with a double thickness of yarn.
- Work a double knit stitch. The knit-colour should match the right-most cell in the grid row.
- Continue to work double knit stitches matching the knit-colours to the colours in the grid row (right to left).
- Knit the last two loops together with a double thickness of yarn.
EVEN ROWS
- Purl the first two loops together with a double thickness of yarn.
- Work a double knit stitch. The purl-colour should match the left-most cell in the grid row: use the contrasting colour first.
- Continue to work double knit stitches matching the purl-colours to the colours in the grid row (left to right).
- Purl the last two loops together with a double thickness of yarn.
Cast off by treating every pair of loops as a single stitch and using the double thickness of yarn.
Adjustments
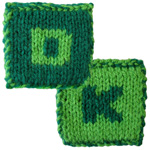
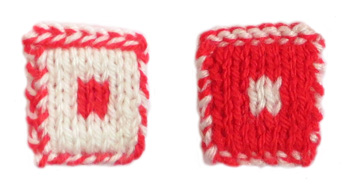
Following the instructions in 'Working a Grid' will result in a small knitted patch that looks like this:
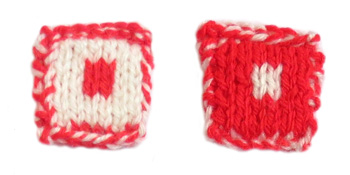
Which is OK, but a bit scruffy along the bottom edge (it's more obvious on the white side). That's because the loops of the cast on stitches were not arranged in any particular order, they were just knitted as they appeared on the needle.
For a neater bottom edge we rearrange the cast on stitches from this:
To match the first row on the grid:

In our case the first row of the grid is all white stitches so we arrange the stitches with the white loops before the red loops.
Knitting the grid again with a neater bottom row results in this:
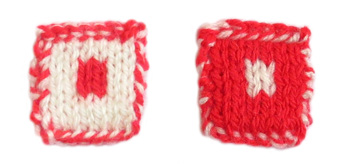
Which is OK, but only shows two rows of plain above the central square when three were worked. This is because the process of casting off obscures the final row of the grid. Repeating the final row of the grid will pad the pattern enough that it all shows:
Giving a neater result.
<<< Back to Notes
© 2014 All desgins and images are copyright of ODDknit.