UNDER CONSTRUCTION - Menu links may be unreliable for a short period.
Planning Stripes
So you're going to design something stripey. Here are a few things to consider before you begin.
The Wrong Side
If you're knitting stripes for something that has a definite right side (e.g. a stuffed toy) you don't need to worry what the wrong side of the fabric looks like. If you're knitting something where both sides will be visible (e.g. a scarf) you'll want a neat finish on both surfaces. Consider the picture below, where you can see a single colour change in some of the most common stitches (plus the double knitting technique because it's wonderful and I love it).
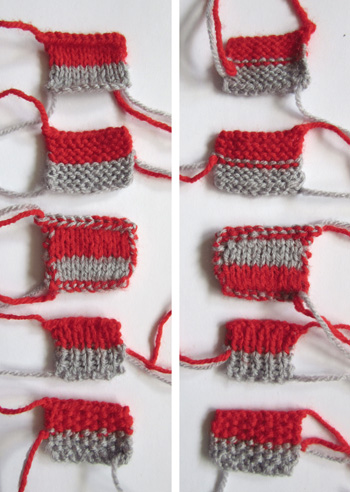
The top two patches (stocking stitch and garter stitch) have one side where the colour change is a hard edge and one side where there is an overlap. Not good stitch choices if you want two the two sides of a fabric to match. In garter stitch any stripes will need to be an even number of rows to get all the neat colour changes on the same side.
The third patch down shows a colour change in double knitting. This looks like right side stocking stitch and has the same neat edge on both sides, with colours reversed. This technique takes a comparatively long time to knit up so I would use it to emphasise a contrast or for more complicated colour designs.
Colour changes in the fourth and fifth patches (rib stitch and moss stiche) look the same on both sides. The rib stitch has a hard edge to the colour change (when it's not stretched) and the moss stitch gives a fuzzier overlap.
Stripe Width
I've done whole other sections on exciting ways to choose the widths of your stripes. But some general points to bear in mind are listed below.
When knitting in the flat on regular needles make each stripe an even number of rows. That way you'll be able to pick up the next colour from the edge without cutting the yarn.
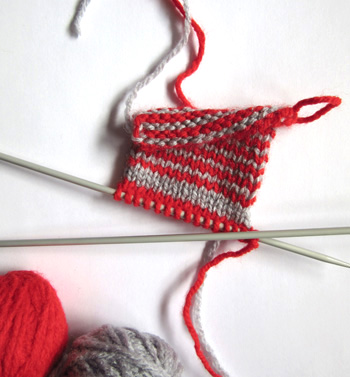
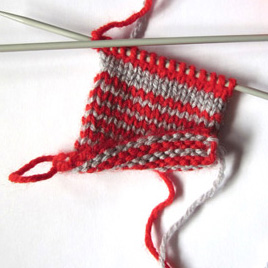
When knitting in the flat on double pointed needles you can make the stripes any width you like, just begin knitting a row from the end where the next colour of yarn is attached and adjust the stitch to match. For example in the single row stripes below I knitted one row red and without turning pushed all the stitches back along the needle to knit the second row grey. To continue I had to turn the knitting and purl one row red, then swap ends again to purl the fourth row in grey.
When knitting in the round consider wider stripes. Jogless knitting techniques are good for hiding the jump when a colour is changed but pull the knitting tight at the start of the round. Wider stripes leave you with a more even finish overall.
<<< See more Stripe Design Ideas.
© 2017 All desgins and images are copyright of ODDknit. If you enjoy the content of this website, please consider buying me a coffee at the link below.
