

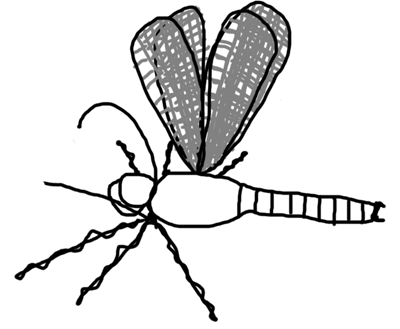
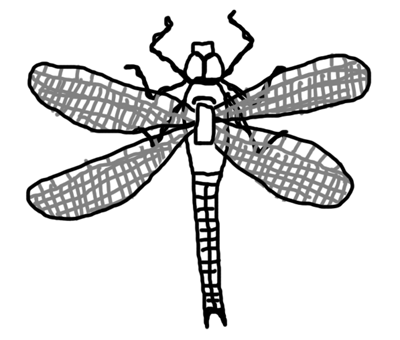
Dragonfly (R3)

I've always wanted to knit something with transparent wings, partly just to prove I can (and did!) and partly because the veiny patterns already look something like stretched knitting. This pattern is based on the male Emperor Dragonfly but you could knit most members of that family with the same pattern, just change the colours.
A printable version of this pattern is available.
You will need:
- black, blue and green yarn (dk weight)
- toy stuffing
- black sewing thread
- black wire (0.6mm approx)
- 4 x double ended knitting needles (3.25mm)
- 2 x knitting needles (4mm)
- tapestry needle
- scissors
- wire cutters
Pattern:
(A list of abbreviations is available.)
Body – Make 1
The set up stitches are worked in black on 3.25mm dpns.
Cast on 12sts. Cast off 3sts, kfb x 4, k1, cast off remaining 3sts.
We are going to separate out the stitches onto multiple needles so we can start knitting in the round. Hold two dpns to the right of the knitting. Slip the first stitch onto the front needle and the second stitch onto the back needle. Repeat until there are five stitches on each needle.
Slip the first 2sts on the front needle onto a third dpn. The first round starts in-between the two front needles, 2 sts on the right, 3 sts on the left.
Work as follows, keeping track of which colour is used for each row.
- Rounds 1&2, Blue: [sl1, k4] x 2 (10)
- Round 3, Black: [k1 wrapping the yarn twice around the needle, k4] x 2
- Round 4, Blue: [sl1 of the wrapped loops while dropping the second loop, k4] x 2
- Round 5, Blue: [sl1, k4] x 2 (10)
Repeat rounds 3-5 ten times total. Stuff very gently as you go. You want the tube to be stiff enough that it doesn't bend under it's own weight, but you don't want to stretch the stitches.
- Round 33, Black: [k1 wrapping the yarn twice around the needle, k4] x 2
- Round 34, Blue: [sl1 of the wrapped loops while dropping the second loop, k2] x 2
- Round 35, Blue: {sl1, [k1, inc1, k1] x 2} x 2 (14)
- Round 36, Black: k –
- Round 37, Blue: [sl1, k6] x 2
- Round 38, Blue: k –
- Round 39, Black: k –
- Round 40, Green: k9, w&t/ p3, w&7t/ k8 (14)
- Round 41, Black: k –
- Round 42, Green: sl1, k13
- Round 43, Green: k2, inc, k4, inc, k3, inc, k4, inc, k1 (18)
- Rounds 44-49, Green: k –
- Round 50, Green: k3, inc, k4, inc, k5, inc, k4, inc, k2 (22)
- Rounds 51-56, Green: k –
- Round 57, Green: [k1, k2tog x 5] x 2 (12)
- Rounds 58-59, Black: k –
Rearrange the stitches into three equal sets. The third to sixth stitches make Set 1. The seventh to tenth stitches make the Set 2. The last and first two stitches make set 3. Each set is worked individually.
Sets 1 and 2 are worked all in blue, as follows:
- Round 1: kfb x 4, join into the round. (8)
- Round 2: kfb x 8 (16)
- Rounds 3-6: k –
- Round 7: k2tog x 8 (8)
Stuff the shape. Graft the join closed using Kitchener stitch to bind the first four stitches to the last four.
Set 3 is worked all in green, as follows:
- Round 1: k4, cast on 4, join into the round.
- Round 2: k –
- Round 3: [kfb, k1] x 4 (12)
- Round 4: k –
- Round 5: [kfb, k3, kfb, k1] x 2 (16)
- Rounds 6-8: k –
- Round 9: [k1, k2tog, k3, k2tog] x 2 (12)
- Round 10: k4, w&t/ p2, w&t/ k8, w&t/ p2, w&t/ k4 (12)
- Round 11: k –
Add a small amount of stuffing to the open end then graft close using Kitchener stitch.
Wings – Make 4
Using black cotton on 4mm needles, cast on 4 sts.
- Row 1: kfb, k to last 2sts, yfwd, k2tog
- Row 2: p –
Repeat rows 1 and 2 five more times. (10)
- Row 13: kfb, k to last 2sts, yfwd, k2tog
- Row 14: p –
- Row 15: k to last 2sts, yfwd, k2tog
- Row 16: p –
Repeat rows 13-16 three more times. (14)
- Row 29: k2tog, k10, k2tog (12)
- Row 30: p –
- Row 31: k2tog, k8, k2tog (10)
- Row 32: p2tog, p6, p2tog (8)
Cast off loosely.
Wing Joint – Make 1
This is a very small add on. Just cast on 6sts in green on the 3.25mm dpns, i-cord 6 rows, and then cast off.
Making Up:
Finish the head of the dragonfly by wrapping the green head portion up and over the top of the two blue shapes. Fix into place with a few hidden stitches.

Using a few large stitches embroider a black Y shape to emphasize the face of the dragonfly.
Sew all other loose ends into the body of the dragonfly.

You need around 70cm of wire and two of the knitted wings. If in doubt don't cut the wire until after the next step.

Pick up stitches along the edge of the knitted wings and slip them onto the wire. Pay attention to where the larger holes are. They need to end up on the top edge of the wings.

Make two sets of two wings on separate wires. Make sure the wire loops are big enough that the knitting is stretched taught. Twist the ends of wire together to join the wings.

Work in loose ends of the thread by sewing it down the edge of the wing and tying off at the centre. A dab of glue may help.

Bend the joined wires downwards at right angles. Make sure they are not too long to be hidden by the dragonfly body.

Stab the wire ends into the dragonfly body to fix the wings in position.

Bend this eight pronged shape out of wire.
For scale each of the double thickness prongs are approximately half the length of the complete head and body.

Twist the double thicknesses of wire together and add in a couple of twists to make sure the legs all join together at the centre.
Hold the centre of the shape underneath the neck of the dragonfly. Wrap the two single thickness wires around the narrowest part to firmly fix the legs in place. Trim the ends and point them inwards for safety.
Add in some knee/ankle joints to the legs. You can adjust the leg length by folding the wires over multiple times at the foot.
Sew the i-cord wing joint across the point where the wings enter the body. It will stop them falling out by accident and look neater. As a final finishing touch wrap a couple of large blue stitches around the top of the wing joint.
Notes:
Materials
I've used quite thin wire because it's easy to work with and gives the butterflies a nice trembly behaviour. If you want butterflies that are more steady and sculptural try using thicker wire to support the wings.
Needle/Yarn Size
As with most ODDknit patterns the yarn and needle sizes in the "you will need" section are just a guide. Feel free to improvise with whatever needles and yarn you have lying around - that's half the fun!
<<< See more Creepy Crawlies
© 2018 All desgins and images are copyright of ODDknit. If you enjoy the content of this website, please consider buying me a coffee at the link below.