Trilobite (R2)

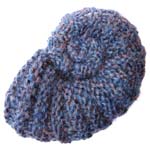
Trilobite means “three lobed” because if you look at a trilobite fossil (or indeed a knitted trilobite fossil) its body is divided into three lengthways sections. Our trilobites have been knitted still partially encased in rock.
A printable version of this pattern is available.
You will need:
- 4 ply or sock wool in greys
- toy stuffing
- 4 x double ended knitting needles (3mm)
- tapestry needle
- scissors
Pattern:
(A list of abbreviations is available.)
Trilobite
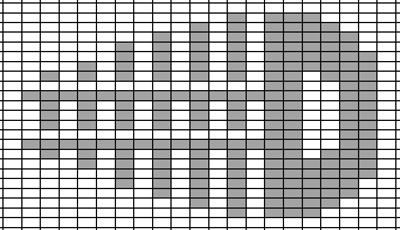
First we are going to make an embossed trilobite design on a flat rectangle of knitting. The design is shown on the grid and instructions are written out in full below.

Cast on 21 stitches.
- Row 1: p –
- Row 2: k4, p3, k1, p1, k12
- Row 3: p10, [k1, p1] x 2, k4, p3
- Row 4: k2, p5, [k1, p1] x 3, k8
- Row 5: p6, [k1, p1] x 4, k5, p2
- Row 6: k1, p6, [k1, p1] x 4, k6
- Row 7: p4, [k1, p1] x 5, k6, p1
- Row 8: k1, p3, k1, p2, [k1, p1] x 6, k2
- Row 9: p1, k15, p2, k2, p1
- Row 10: k1, p2, k2, p2, k14
- Row 11: p2, [k1, p1] x 6, k2, p2, k2, p1
- Row 12: k1, p2, k2, p2, [k1, p1] x 6, k2
- Row 13: as row 11
- Row 14: k1, p2, k2, p15, k1
- Row 15: p14, k2, p2, k2, p1
- Rows 16 to 23: as rows 8 to 1 – please note that the order of rows is reversed to create a symmetrical pattern.
Cast off.
Rock
Pick up and knit 60 stitches around the edge of the trilobite (not around the edge of the rectangle, around the edge of the trilobite pattern on the rectangle – follow the dotted line in the diagram below). Continue in the round.

- Round 1: p – (60)
Increase four stitches in each of the next three rounds. Increases are worked using pfb and all other stitches are purled. Space the increases randomly – you are knitting a rock so it should be a little uneven.
- Rounds 5 to 9: p – (72)
Decrease four stitches in each of the following rounds until only 20 sts remain. Decreases are worked using p2tog and all other stitches are purled. Again space the decrease randomly.
Making Up:
Lightly stuff the knitted rock.
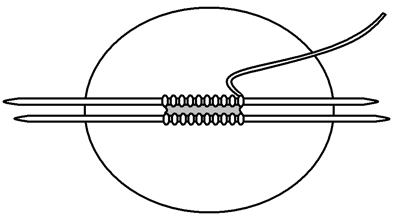
Divide the remaining stitches evenly between two needles and cut the yarn leaving a tail for sewing up. Thread the loose end of yarn onto a tapestry needle and hold the two knitting needles together so that the tail of yarn is at the top right. We are now going to graft the two sides of the opening together using reverse Kitchener Stitch.

Insert the tapestry needle k-wise into the first stitch on the front needle then p-wise into the first stitch on the back needle.
The next four steps form the Kitchener stitch. Repeat until all stitches have been grafted together.
Insert the tapestry needle:
- p-wise into the first stitch on the front needle, slip this stitch off the needle.
- k-wise into next stitch on front needle, leave this stitch on the needle.
- k-wise into the first stitch on the back needle, slip this stitch off the needle.
- p-wise into the next stitch on the back needle, leave this stitch on the needle.
Sew in the remaining loose end.
Notes:
Needle/Yarn Size
As with most ODDknit patterns the yarn and needle sizes in the "you will need" section are just a guide. Feel free to improvise with whatever needles and yarn you have lying around - that's half the fun!
<<< See more Fossils
© 2011 All desgins and images are copyright of ODDknit. If you enjoy the content of this website, please consider buying me a coffee at the link below.


