Stitch Dimensions and Pattern Design
Being able to compare stitch dimensions is useful when replacing one knitted stitch with another, planning projects that use multiple different stitches, or when inventing new textures to knit with. The measurement we are going to use to compare stitches is percentage difference because it remains constant across all sizes of knitting.
The Library
I've been building up a library of stitch dimensions for 3.25mm needles and dk yarn. By keeping the needles and yarn constant I know that I can compare all measurements in the table directly.
In this section I'm also going to assume that the relationships between stitches would remain constant if I'd used another size needle or yarn (e.g. if two stitches have matching widths on 3.25mm needles they will have matching widths when both knitted on 6mm needles with cable weight yarn). I'm making this assumption because experience tells be it's probably true, and re-knitting the table multiple times would take ages.
At this time I will be discussing only knit/purl stitches. The theories are applicable to slip, twisted and lace knitting too, I just haven't listed the dimensions for them yet.
Replacing Stitches in Existing Patterns
Imagine a scruffy jumper knitted in stocking stitch then re-knitted to the same pattern in garter. By looking at the stitch dimensions in the library table we can assume that the height of the jumper will shrink (because the stitch height is less for garter than for stocking stitch), but how much overall difference will the change make?

If you intend to swap one knitting stitch for another within an existing pattern, comparing the stitch dimensions helps you predict the differences this will cause to the finished item. We're going to compare the old and new dimensions using percentage difference.
Percentage difference (D) is worked out by subtracting the original value from the new value (to get the difference), then dividing by the original value and multiply by 100 (to get the percentage).
For stitch widths (SW) the calculation is:

For stitch heights (SH) the calculation is:

Let's go back to that scruffy jumper knitted in stocking stitch then re-knitted in garter. Taking the stitch dimensions from the library table we can calculate percentage difference for width and height.
DW = (4.3 - 4.2) ÷ 4.2 x 100 = 2%
DH = (2.1 - 3.0) ÷ 3.0 x 100 = -30%
The difference in widths is only 2% and can be discounted, but the stitch height of garter is 30% smaller than for stockinette. If no adjustments were made to the pattern the new jumper would come out shorter in the arms and cropped in the body. It would still be the same width around the chest though.
If we re-knitted the jumper again in rib stitch then, according to the values in the stitch library, the height would only be 3% different to the original but the width would be 26% smaller.

This jumper would be much narrow around the body than intended, but at least the arms would be long enough.
By using the table we can see that Irish moss stitch naturally has dimensions that are similar to stocking stitch. If we chose to re-knit the jumper in Irish moss stitch the height would be 6% smaller and the width would stay the same.

Overall replacing stockinette with Irish moss will make little difference to the way the jumper fits so it is a more sensible choice as a replacement stitch than either garter or rib.
Comparing stitch dimensions from the table allows you to predict how a pattern will be changed by altering the stitch it is knitted in. Knowing about these changes ahead of time lets you compensate for them as you knit by adding/removing a percentage of stitches or swapping needles. If all that sounds too complicated you can always choose another stitch that more closely matches the dimensions of the original.
Combining Stitches
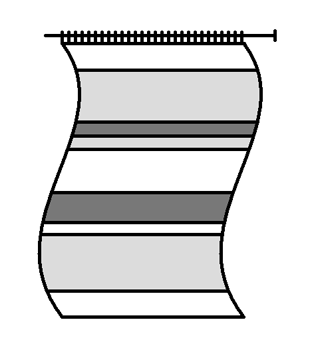
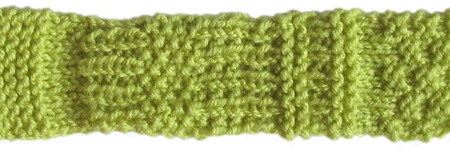
Consider a piece of knitting that has horizontal stripes of different stitches.

If the piece is very narrow (say less than 10 stitches across) you can combine virtually any stitches you like. Even the largest differences in stitch widths are measured in millimetres so it takes multiple stitches before the cumulative difference becomes noticeable. At most the sides of the piece will undulate in and out a little.
Knitted fabrics are stretchy. If the stitch type is changed often, (say less than 10 rows per stripe) then the widths of the stitches will probably average out. The wider stitch will pull the narrow one outwards and the narrow stitch will pull the wide one inwards.
If you're knitting something very small or something with narrow distances between stitch changes you can combine virtually any stitches you like with minimal issue.

As the piece gets wider and the stripes thicker it becomes more important to combine stitches with similar widths. The give in knitted fabric still allows you to combine stitches that don't match exactly, but the larger the horizontal stripes the smaller the range in stitch widths needed for the fabric to lie flat. If there's a large difference in stitch widths then you'll see some stripes wrinkling and the edges of the piece will warp or curl.
For example changing from garter (Library SW = 4.3mm) to rib (Library SW = 3.1mm) gives a decrease in width of 28%. Knit substantial horizontal stripes of these two stitches and the width difference will become too large for the stretch of the fabric to compensate for neatly. You'll end up with wrinkly garter stripes.

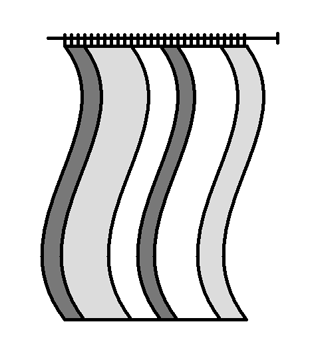
The exact same theories apply to vertical stripes and stitch heights. Stocking stitch and rib have very similar stitch heights (only 3% difference) and they could be knitted in large vertical stripes without issues. Garter and rib are again, very different (48% difference in height). Knit large vertical stripes of garter and rib and you'll end up with wrinkly rib stripes.
If I wanted to knit stitches in large blocks rather than stripes I would need to make sure both the heights and the widths were similar.

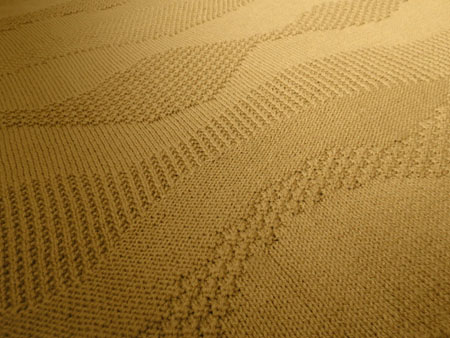
This is my sand waves blanket. It was during the planning for this that I started to write up my library table for the first time. Most of the waves are stockinette but around half are other knit/purl stitches. I excluded rib and double rib because their stitch widths were too small in comparison to the others. I didn't use anything except knit/purl stitches because I wanted the fabric to be consistently dense and stretchy.
The stitches I did use were:
- stocking stitch (SH=3.0, SW = 4.2)
- reverse stocking stitch (SH=3.0, SW = 4.2)
- ridged rib (SH=2.6, SW = 4.1)
- irish moss (SH=2.8, SW = 4.2)
- basket weave (SH=2.2, SW = 4.3)
- broken rib (SH=2.6, SW = 4.2)
- box (SH=2.4, SW = 4.4)
As you can see the stitch widths are very close (±0.3mm, at most 5% width difference from stocking stitch) but there is a bit more variety in the stitch heights (±0.8mm, as much as 27% height difference from stocking stitch).
I have to confess that while the blanket looks great draped over things the large variance in stitch heights does cause problems. The stocking stitch waves tend to wrinkle when you lay it down flat (I smoothed it out for the photo). I could have left out basket weave and box stitches, which would have reduced the overall percentage height differences, but the whole point of the blanket was to be a sampler of knit/purl stitches. The range of stitches I chose was already quite limited and I didn't want to reduce it further.
The only two stitches on the blanket that have exactly the same dimensions are stocking stitch and reverse stocking stitch which are, in fact, the same stitch with knits and purls reversed. By combining these two stitches in blocks we can invent new textures and be confident the fabric will not warp.
Inventing Knit/Purl Textures
You'll notice I said “textures” and not “stitches” in that title. The way I look at it knit/purl stitches have a small repeat, while knit/purl textures are larger, repeating areas made up of different stitches.
The first two grids below show moss and box stitches. The third grid shows a quite similar design but with a much larger repeat. I would therefore describe it as a texture of stocking stitch squares rather than a stitch in its own right.


Why am I making the distinction?
It's pretty impossible to invent new knit/purl stitches with a small repeat because they've all been done before, multiple times, with multiple names. Inventing new knit/purl textures is easier because the repeats are larger. It's still difficult to confirm that what you've made is unique in all of knitting history (it probably isn't, people have been doing this a long, long time). My advice is to invent what you need without worrying about whether someone else got there first.
The other difference between stitches and textures as I am using the words, is that stitch dimensions vary quite a lot for different knitting stitches – that was the point of the library table after all. Stitch dimensions for textures are generally more predictable based on the stitches you build them out of. We'll discuss predicting stitch dimensions further in the next section.
So, inventing your own texture. Consider this selection of tessellating shape knitting charts. They were drawn out as colour designs for plain stocking stitch but they could just as easily be knitted as alternating areas of stocking stitch and it's reverse. Shapes don't have to be tessellating to be used in this way, they can be regular or irregular, reversible or not, I'm using these charts as an example because I had them to hand.
There is a blank stocking stitch grid available here if you want to design your own knit/purl textures.

When I designed this hot water bottle cover I wanted a large pattern texture to make the body of the cover more interesting. I drew out a new grid chart of vertical waves, then knitted them up in alternating stocking stitch and reverse stocking stitch.
The hot water bottle cover also takes structural advantage of the small stitch width of ribbing. By swapping to a 4x4 rib to close up the opening it was unnecessary to do any extra shaping at the neck end of the cover.
We discussed at the start of the page how changes in stitch dimensions are less important over smaller areas. Keep the pattern repeats little enough and there's no reason you can't combine areas of any stitches you like. I just find stocking stitch/reverse stocking stitch is a good place to start for a pronounced texture.
<<< Back to Tension.
© 2016 All desgins and images are copyright of ODDknit.


