

Right-Angled Triangles
All right-angled triangles can all be knitted such that you only have to change the number of stitches along one edge to form the shape. In this section we will calculate the rate at which we do this for a given angle.
1. Choose a Size, Shape and Stitch
To specify the size and shape of a right-angled triangle we need to give the lengths of two sides, or the length of one side and an angle (not the right angle, we already know about that one).
Choosing a simple stitch for the triangle is best. Keeping patterns correct is a lot easier if you can tell which stitch you are on from the row below.
As an example we are going to knit a triangle in rib, with double knit, on 3.5mm needles, with a small angle of 30° and a small edge of 45mm.
2. Find Height and Width
All right-angled triangles can be considered as a rectangle divided in half diagonally. Just as every rectangle has a width, W, (the measurement side to side) and a height, H, (the measurement from top to bottom), so has every right-angled triangle.

This is a useful way to consider the triangles because it means we've already covered most of the maths on the rectangles page.
If you know H and W from choosing your triangle in section 1, go straight to the next step. If (as is the case for our example) your triangle was defined by giving other measurements we will need to do a little more maths.
We already know H = 45mm.
To work out W we use trigonometry. There are many are many websites that explain how to do this better than I am able, so I won't go into details here. If the T-word itself fills you with horror, you may like to use an online calculator. These will work out the missing measurements of your triangle for you, just enter the two measurements you do know.
Using trigonometry we find W = 78mm.
Here is our example with the rest of the measurements filled in.
3. Find SH and SW
Find the stitch height (SH) and stitch width (SW) by following the instructions for making a tension patch. Be sure to use the same stitch, needles and yarn as you will use for your finished triangle.
Rib Stitch, in double knit, on 3.5mm needles has SH = 3.67mm and SW = 3.30mm
3. Cast On
On the rectangles page we rearranged the tension patch equation to tell us how many stitches we needed to cast on. We can use the same equation now.
For our rib stitch triangle W = 78mm and SW = 3.3mm.
nW = W ÷ SW = 78mm ÷ 3.3mm = 24
(Well, 23.6 but you have to round to the nearest whole number)
To make the rib stitch triangle, cast on 24 stitches.
4. How Many Rows?
On the rectangles page we also had an equation for how many rows we needed to work for a given height.
For our rib stitch triangle H = 45mm and SH = 3.7 mm.
nH = H ÷ SH - 2 = 45mm ÷ 3.7 mm - 2 = 10
(Again we round to the nearest whole number.)
To complete our triangle we will need to cast on, work 10 rows and cast off.
5. Calculate the Decrease
The triangle needs to taper to a point. This means the cast off edge will have a lot less stitches in it than the cast on edge. To make a straight edge we want to change the number of stitches at a constant rate.
The number of stitches removed per row is our rate of change (R). It is equal to a difference of nW stitches per nH + 2 rows (remember we add two for the cast on and cast off edges).
For our rib stitch triangle nW = 24 and nH = 10.
R = nW ÷ nH + 2 = 24 ÷ 10 + 2 = 24 ÷ 12 = 2
We want to decrease 2 stitches per row.
But what if the maths hadn't worked out so neatly? What if our answer had been 0.666667?
We could round up, but almost half a stitch a row is quite a significant difference. Instead, if you get a fraction, go back a step: 0.6666667 = 10 ÷ 15.
Rewrite 10 ÷ 15 as 10/15. It means exactly the same thing but I find it helpful because I'm so used to reading a forward slash as 'per'. We want 10 fewer stitches per 15 rows.
The fraction 10/15 can be simplified to 2/3. (Simplify fractions by dividing top and bottom digits by the same number). Now the answer reads 2 fewer stitches per 3 rows which is quite simple to do.
6. Knit the Triangle
Knit your triangle keeping the pattern correct.
Decrease at a rate of R stitches per row, always on the same edge. Decreases can be made by knitting stitches together, by casting off, or by knitting short rows.
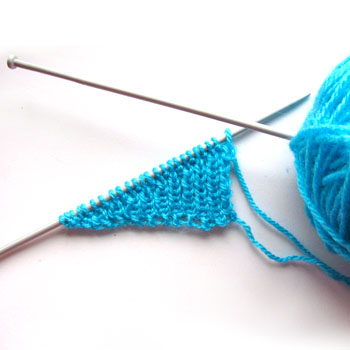
For our rib stitch triangle we will use short rows.
Cast on 24 sts.
- [k1, p1] x 12, turn
- [k1, p1] x 10, turn
- [k1, p1] x 10, turn
- [k1, p1] x 8, turn
- [k1, p1] x 8, turn
- [k1, p1] x 6, turn
- [k1, p1] x 6, turn
- [k1, p1] x 4, turn
- [k1, p1] x 4, turn
- [k1, p1] x 2, turn
- [k1, p1] x 2, turn
Cast off 24 sts.
6. Check Your Measurements
Once you have completed your triangle check its measurements against what you intended. Hopefully they'll match up.
The rib stitch triangle came out a little small.
This triangle was used as the basis for the ODDknit hat pattern. The 30° angle we specified for the small corner meant that by the time we had knitted 12 triangles together we had 360° of knitting, a complete circle. The 45mm edge of each triangle meant that the hat was 540mm in circumference, my head size-ish.
<<< Back to Shapes.
© 2012 All desgins and images are copyright of ODDknit.