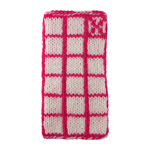


Side-to-Side Hat (F2)

This hat is knitted in the flat with a garter stitch trim and stocking stitch body. It starts at one ear, increase until the halfway line, then decrease down the other side. Changing colours at the end of the rows gives you stripes that loop from the front of the hat to the back in parallel lines.
A printable version of this pattern is available.
You will need:
- 2 shades of dk yarn
- 3.25mm knitting needles
- tapestry needle
- scissors
Pattern:
(A list of abbreviations is available.)
See 'Notes' for tension and colour charting grid.
Cast on 22 stitches.
Work the following, changing colours after row 2 and every four rows subsequently. Do not cut the yarn at the colour change, carry it along the back edge of the hat.
- Row 1: p1, k9, kfb x 2, k10 (24)
- Row 2: p1, k9, pfb x 4, k10 (28)
- Row 3: p1, k27
- Row 4: p1, k9, p8, k10
- Row 5: p1, k9, [k1, inc] x 7, kfb, k10 (36)
- Rows 6 to 8: Work Flat*
* "Work Flat" as follows:
- Even Rows: p1, k9, purl to last 10sts, k10
- Odd Rows: p1, knit to the end
Repeat as necessary.
- Row 9: p1, k9, [k1, inc, k1] x 8, k10 (44)
- Rows 10 to 12: Work Flat
- Row 13: p1, k9, [k1, inc, k2] x 8, k10 (52)
- Rows 14 to 16: Work Flat
- Row 17: p1, k9, [k1, inc, k3] x 8, k10 (60)
- Row 18 to 20: Work Flat
- Row 21: p1, k9, [k1, inc, k4] x 8, k10 (68)
- Row 22 to 28: Work Flat
- Row 29: p1, k9, [k1, inc, k5] x 8, k10 (76)
- Row 30 to 32: Work Flat
- Row 33: p1, k9, [k1, inc, k6] x 8, k10 (84)
- Row 34 to 40: Work Flat
- Row 41: p1, k9, [k1, inc, k7] x 8, k10 (92)
- Row 42 to 64: Work Flat
- Row 65: p1, k9, [k1, k2tog, k6] x 8, k10 (84)
- Row 66 to 72: Work Flat
- Row 73: p1, k9, [k1, k2tog, k5] x 8, k10 (76)
- Row 74 to 76: Work Flat
- Row 77: p1, k9, [k1, k2tog, k4] x 8, k10 (68)
- Row 78 to 84: Work Flat
- Row 85: p1, k9, [k1, k2tog, k3] x 8, k10 (60)
- Row 86 to 88: Work Flat
- Row 89: p1, k9, [k1, k2tog, k2] x 8, k10 (52)
- Row 90 to 92: Work Flat
- Row 93: p1, k9, [k1, k2tog, k1] x 8, k10 (44)
- Row 94 to 96: Work Flat
- Row 97: p1, k9, [k1, k2tog] x 8, k10 (36)
- Row 98 to 100: Work Flat
- Row 101: p1, k9, k2tog x 8, k10 (28)
- Row 102: p1, k9, p8, k10
- Row 103: p1, k9, k2tog x 4, k10 (24)
- Row 104: p1, k9, p2tog x 2, k10 (22)
Cast off remaining stitches.
Making Up:
The shaping in the hat will naturally bend the cast-on and cast-off stitches into an arch. To finish off sew the two sides of each arch together. You could leave the stitches unsewn but it will make your ears cold when you wear the hat.

Weave in any remaining loose ends. There won't be many if the hat has been knitted as described, but if you've been a bit more adventurous with the colouring (see Variations) it may take a while!
Variations:
As described the hat will have regular rows of alternating colours, but I also wanted to be able to work up more complicated patterns that take advantage of the hat's construction. To that aim I drew up the pattern as a knitting chart grid (click to enlarge).

The chart is worked from the cast on edge at the bottom to the cast off edge at the top. Thicker lines show the divisions between the garter stitch trim / body of the hat and also between repeating sections of shaping, which are nine stitches across at the maximum. To represent a hemispherical pattern on a flat grid I had to include wedges of grey. Just skip over them and work stitches in each horizontal line continuously.
I've used two symbols on the grid. This one represents an increase stitch:

The symbol indicates how at the start of the row (bottom of the grid row) there is no stitch at all. The grey parts of the grid are ignored so there isn't a stitch at the base. By the end of the row (top of the grid row) there is a stitch because the grey has been superseded.
This symbol represents a decrease stitch:
Because at the start (bottom) of the row there is a stitch but at the end (top) there is not.
As an example the hat pattern as described would be charted like this...

Notes:
Tension
This is a shallow hat so be careful not to knit too tightly. Using 3.25mm needles 10 sts x 10 sts of the stocking stitch hat fabric covers and area of around 4.2cm wide by 2.8cm tall. This makes a hat that fits a head with circumference 57cm.
<<< See more Cosies
© 2016 All desgins and images are copyright of ODDknit. If you enjoy the content of this website, please consider buying me a coffee at the link below.